Skip to content


As demand for high-speed, low-latency connectivity continues to grow, fiber optic networks have become the backbone of modern communication systems. However, the performance of any fiber network depends not only on cable quality but also on how well it is installed. Poor installation practices can lead to signal loss, frequent failures, and costly maintenance.
This guide focuses on practical installation methods, real-world considerations, and step-by-step procedures to help ensure reliable and efficient fiber optic deployments in homes, offices, and industrial environments.
1. Pre-Installation Planning: The Foundation of Success
Before any cable is pulled or connector is terminated, proper planning must take place.
Route Design and Environment Assessment
Start by mapping the entire cable path:
- Identify entry/exit points, equipment locations, and patch panels
- Avoid high-risk areas such as sharp edges, heat sources, and high-traffic zones
- Maintain separation from electrical cables to reduce interference risks
A well-planned route reduces installation time and minimizes future troubleshooting.
Cable Selection Strategy
Choosing the correct cable type is critical:
| Scenario | Recommended Cable Type | Key Features |
|---|---|---|
| Indoor office | OFNR / OFNP cables | Fire-resistant, low smoke |
| Data center | Tight-buffered or breakout | Flexible, easy routing |
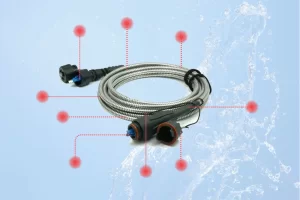
| Outdoor conduit | Armored loose tube | Moisture & crush resistant |
| Direct burial | Double-armored cable | Soil & rodent protection |
| Aerial deployment | ADSS cable | Self-supporting, weatherproof |
Avoid mixing fiber types:
- Single-mode (SMF) for long distances
- Multimode (MMF) for short-range high-speed links

2. Step-by-Step Fiber Cable Installation Process
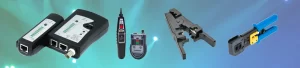
Step 1: Cable Inspection and Testing
Before installation:
- Use a Visual Fault Locator (VFL) to check continuity
- Inspect connectors and jackets for physical damage
- Verify cable specifications match project requirements
Skipping this step often leads to rework later.
Step 2: Measuring and Preparing Cable Length
Fiber routes are rarely straight. Always:
- Add 5–10% length for slack and routing adjustments
- Pre-cut cables only when the route is fully confirmed
- Avoid excessive slack that may cause clutter or bending
Step 3: Cable Pulling and Handling
This is one of the most critical stages.
Best practices:
- Use cable pullers with tension control
- Keep pulling force within manufacturer limits
- Apply lubricant for long conduit runs
- Never twist the cable during pulling
Key rule:
Fiber is glass—it tolerates tension poorly but performs best when handled gently.
Step 4: Managing Bend Radius
Improper bending is a leading cause of signal degradation.
- Static bend radius: ≥ 10× cable diameter
- Dynamic bend radius: ≥ 20× cable diameter
Avoid:
- Sharp turns inside cabinets
- Tight bundling with cable ties
- Routing through narrow conduits
Step 5: Cable Routing and Fixing
Indoor Installation
- Use cable trays, J-hooks, or raceways
- Support cables every 1.5–2 meters
- Keep pathways organized and labeled
Vertical (Riser) Installation
- Pull cables from top to bottom
- Use intermediate supports every 6–10 meters
- Leave slack loops at each floor
Data Center Installation
- Separate fiber and power cables
- Use patch panels for structured management
- Maintain clean routing paths for airflow and maintenance
Step 6: Splicing and Termination
Two main methods are used:
| Method | Use Case | Advantage |
|---|---|---|
| Fusion Splicing | Permanent links | Lowest loss |
| Mechanical Splicing | Temporary or quick fixes | Fast deployment |
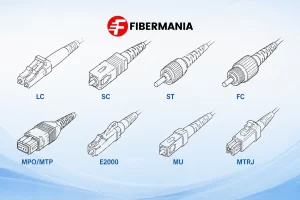
For connectors (LC, SC, FC):
- Clean fiber ends thoroughly
- Use precision cleavers
- Perform termination in dust-free environments
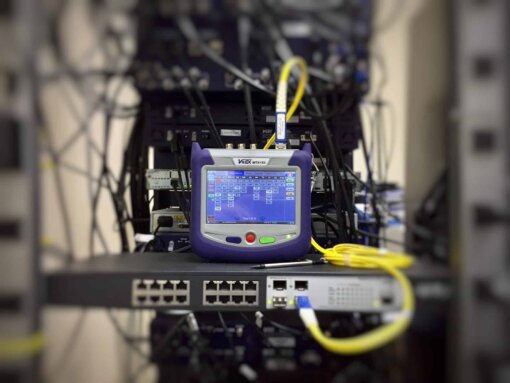
Step 7: Post-Installation Testing
After installation, testing ensures network reliability.
Essential tests include:
- OTDR testing for attenuation and faults
- Optical power measurement
- End-to-end continuity checks
Typical acceptable values:
- Splice loss ≤ 0.3 dB
- Connector loss ≤ 0.5 dB

3. Outdoor Installation Methods Explained
Different outdoor environments require different approaches.
Conduit Installation
Best for urban or protected environments:
- Use HDPE conduits
- Limit bend angles and pulling distance
- Install pull boxes every ~30 meters
Direct Burial
Cost-effective for long-distance deployment:
- Dig trenches below frost line
- Use sand layers for protection
- Add warning tapes above cable
Aerial Installation
Ideal where trenching is not feasible:
- Use ADSS or figure-8 cables
- Maintain proper sag (0.5–1% of span)
- Protect against wind and UV exposure
4. Common Installation Mistakes (and How to Avoid Them)
| Mistake | Consequence | Solution |
|---|---|---|
| Over-bending cables | Signal loss | Follow bend radius guidelines |
| Excessive pulling force | Fiber breakage | Use tension-controlled pulling |
| Mixing fiber types | High attenuation | Clearly label and separate |
| Poor labeling | Maintenance difficulty | Use structured identification |
| Skipping testing | Hidden faults | Test before & after installation |

5. Maintenance and Long-Term Reliability
Installation is only the beginning. To maintain performance:
- Inspect cables every 6–12 months
- Clean connectors regularly
- Check for environmental damage (outdoor)
- Update documentation after changes
A well-maintained fiber network can operate reliably for decades.
Conclusion
Successful fiber optic cable installation requires more than just technical knowledge—it demands careful planning, precise execution, and attention to detail at every stage. From selecting the right cable type to managing bend radius and performing thorough testing, each step plays a critical role in ensuring long-term performance.
By following structured installation practices and avoiding common pitfalls, installers can build networks that deliver high bandwidth, low loss, and exceptional reliability—maximizing both performance and return on investment.